Today, we have lots of tools1 at our disposal to examine the topography of our nearest neighbor, but measurements of lunar mountains were being recorded long before the development of satellites, space travel, and photography. How was it done? With a keen understanding of light and shadow and a whole lot2 of geometry.
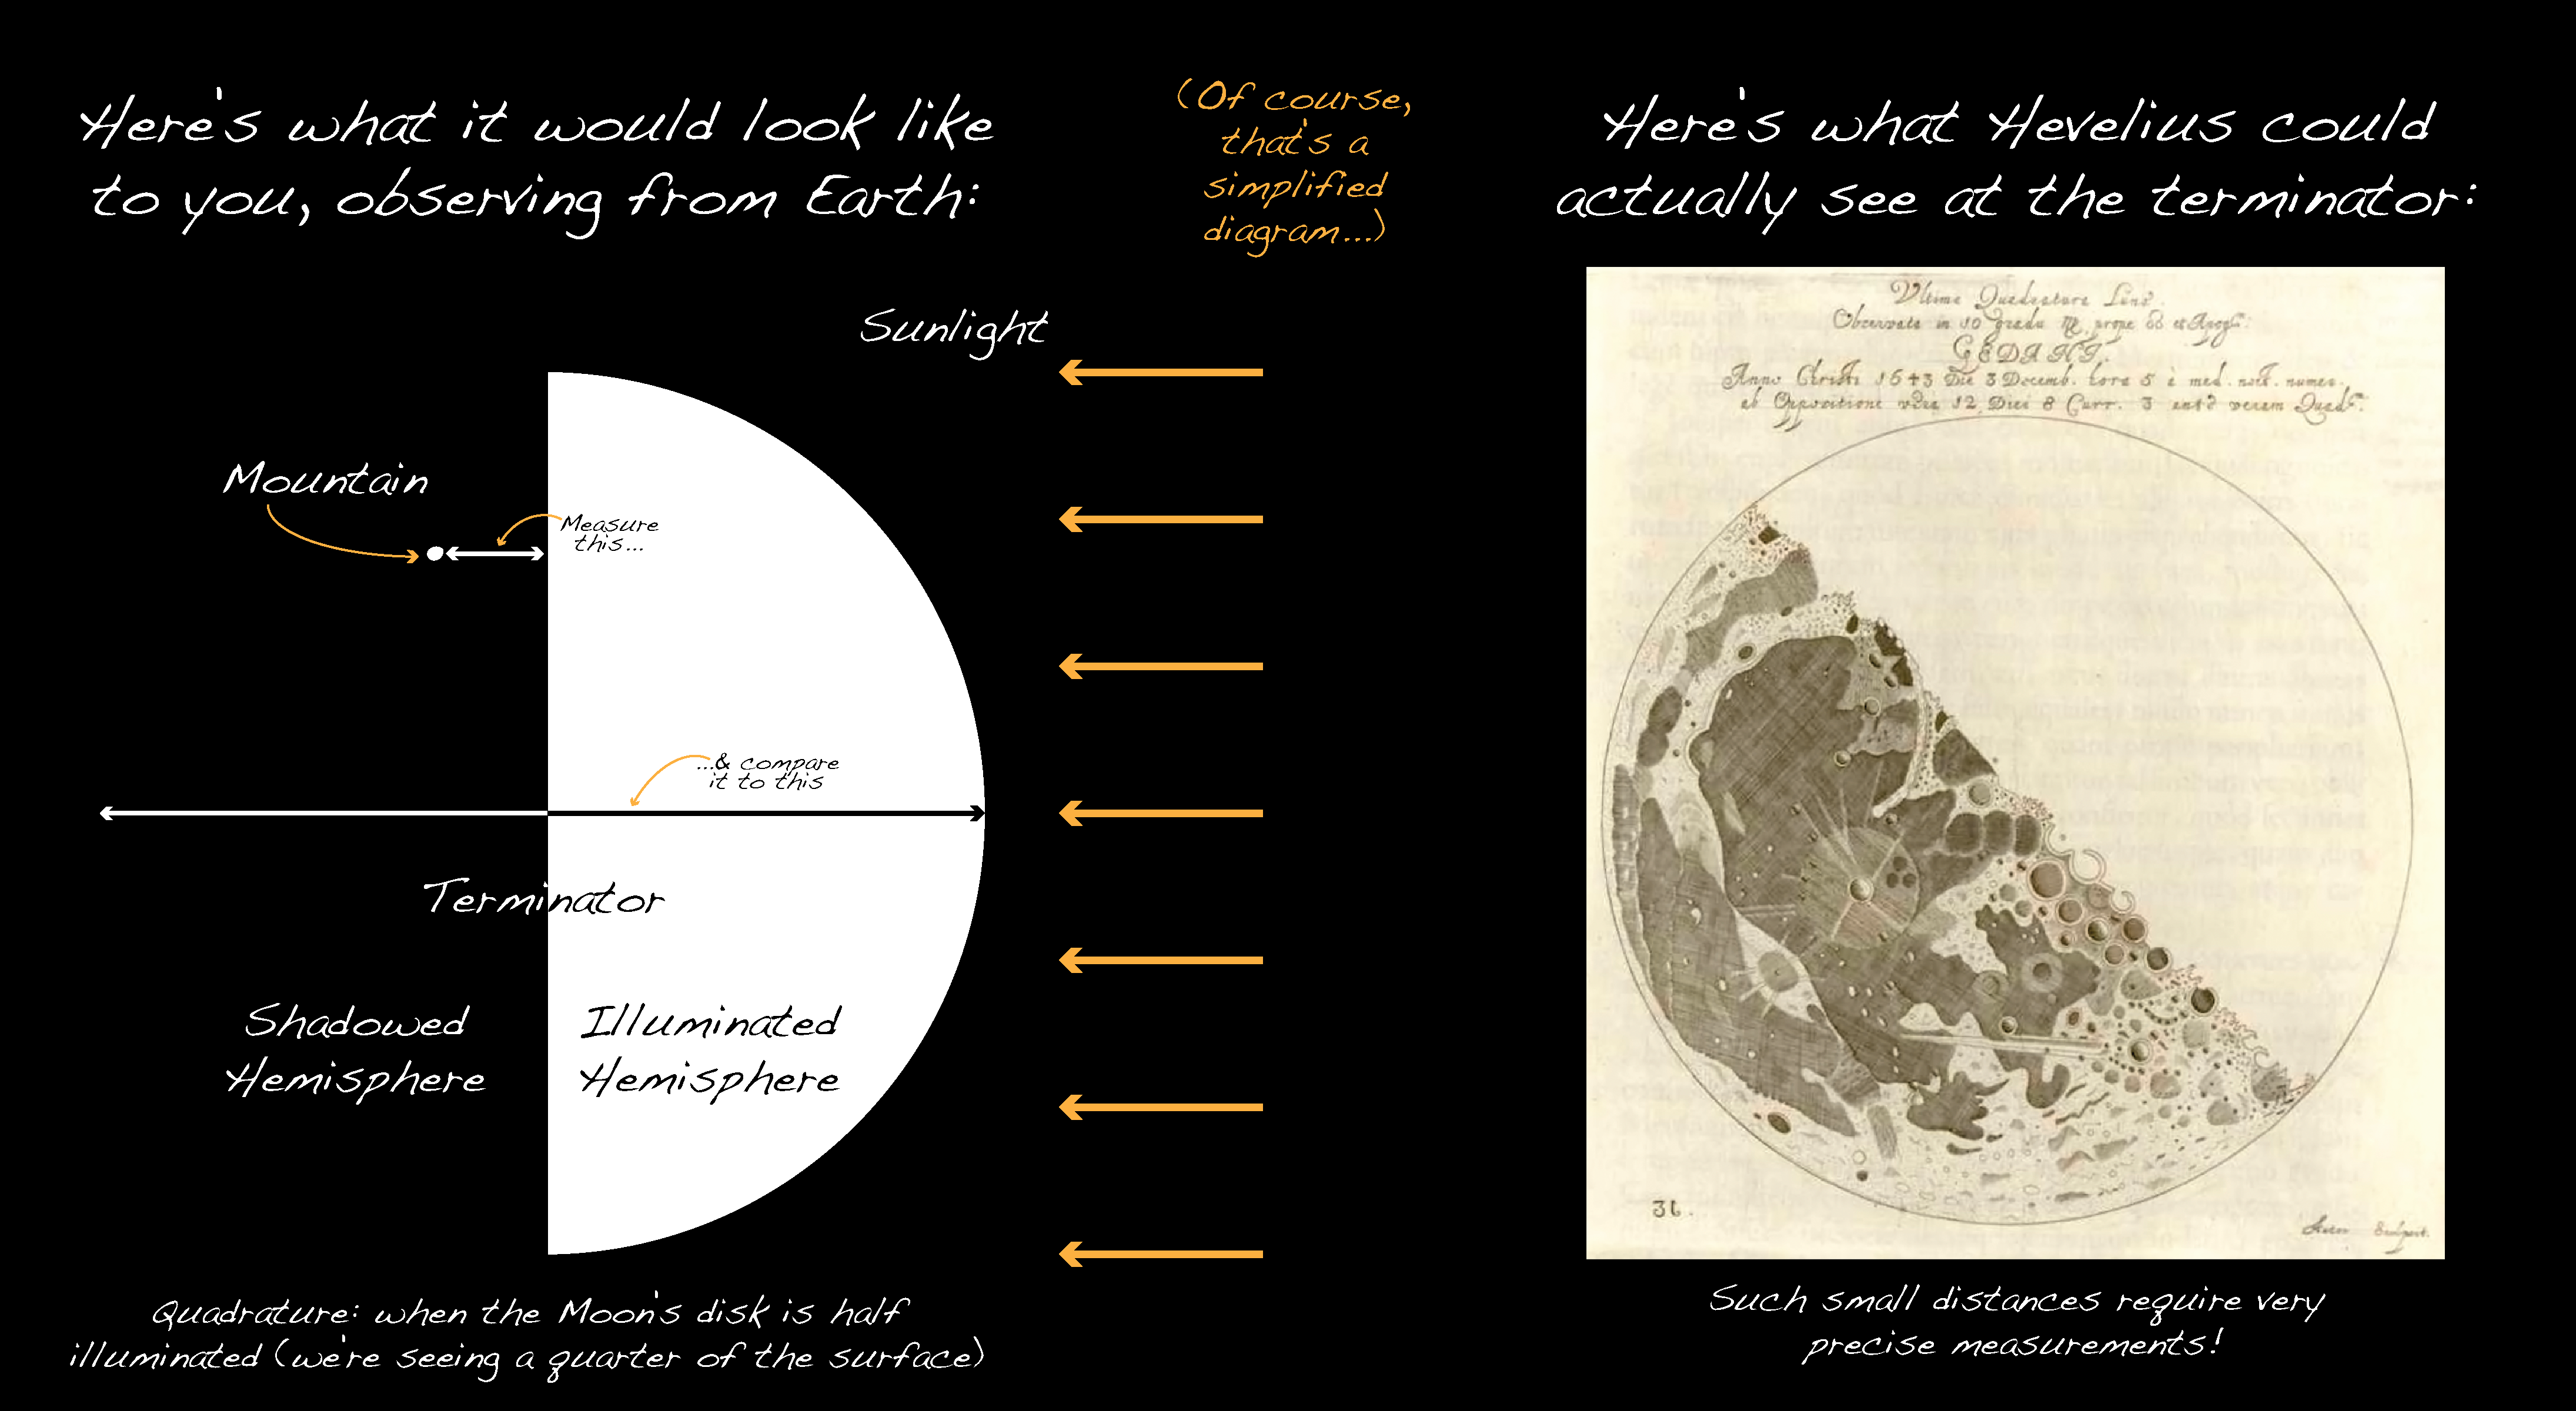
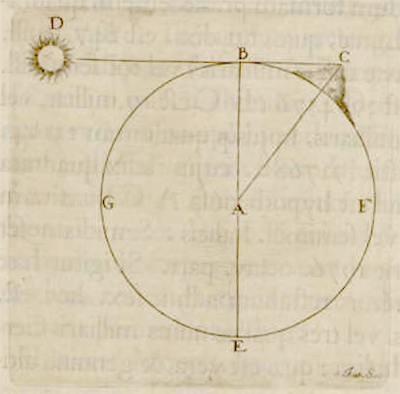 The earliest method I’ve come across, used by Galileo, Riccioli, and Hevelius in the mid-17th century, relied upon a game-changing realization: the shifting pattern of light and dark at the Moon’s terminator (no, not a futuristic killer robot, but the line separating “day” from “night” that sweeps across the lunar disk, creating the familiar phases of the Moon) is caused by sunlight interacting with peaks and valleys. If a bright spot appears beyond the terminator, surrounded by blackness, it must mean that a mountain stands there, its height allowing the peak to catch the sun’s rays while everything around it is shadowed. Hevelius took advantage of this situation to calculate the height of select mountains when the Moon was at quadrature – half illuminated as viewed from Earth. In his figure (left, from Selenographia), the illuminated hemisphere is bounded by the letters BGEA, but the hemisphere viewed by the observer is BGAF. We see a disk half light and half dark, and a ray of light, DBC, just skims the edge of the Moon to hit the peak of a mountain at C. This geometry is special because the ray of light is perpendicular to our line of sight. That means that the distance between the terminator and the mountain (BC) can be directly compared to the diameter of the Moon because you’re seeing it straight on, while at any other angle this distance would be somewhat foreshortened. Once you have that ratio – the distance BC over the lunar diameter – you know the lengths of two sides of the right triangle, and all you have to do is calculate the hypotenuse, CA, and subtract the lunar radius to get the height of the mountain itself. Done!
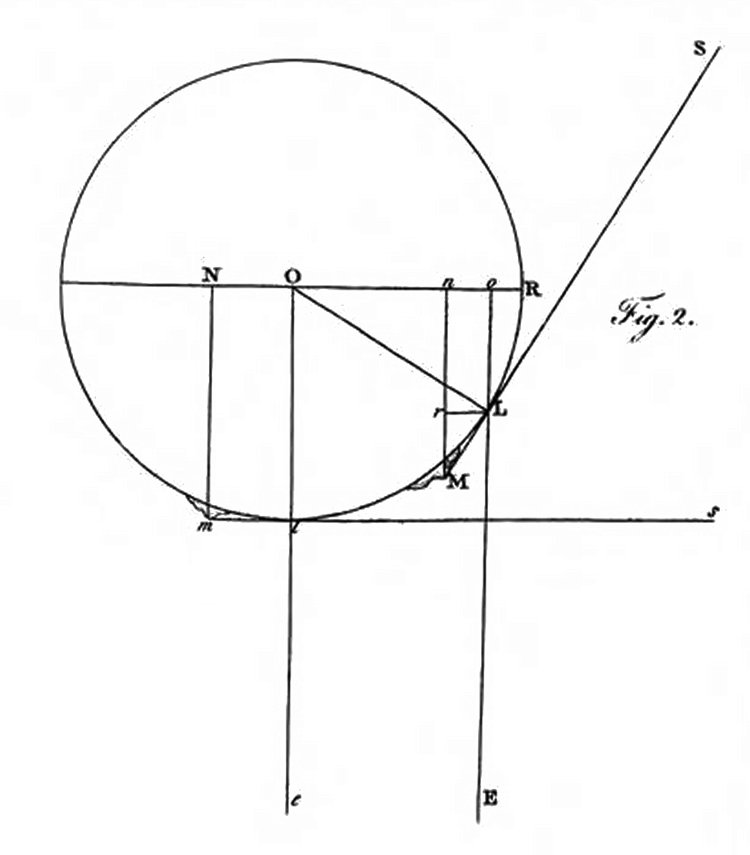 More than a century later, in 1779, William Herschel adapted this method to make use of observations “that were made when the Moon was not in her quadrature” but at nearly any phase. All it takes is recognizing that the distance measured between the mountain and the terminator – now viewed at an angle and therefore appearing shorter than it is – can be related to other known distances that make up the sides of similar triangles. In Herschel’s drawing, the similar triangles are oOL and rLM, and the distance you want to measure is LM, the actual distance between the terminator and the mountain peak, so:
![]()
LO is just the radius of the Moon, on (the same as rL) is the apparent distance that you measured, and Lo is simply related to the angle of the Sun at that particular lunar phase – something you’d look up in a table, or ephemeris, for the given date. Once you have LM, you can make a right triangle with LM, OL, and OM and use the Pythagorean Theorem again to find the height of the mountain.
Here’s a comparison of the two methods from the 1832 Edinburgh Encyclopaedia, which shows the illuminated and shadowed hemispheres in each case:
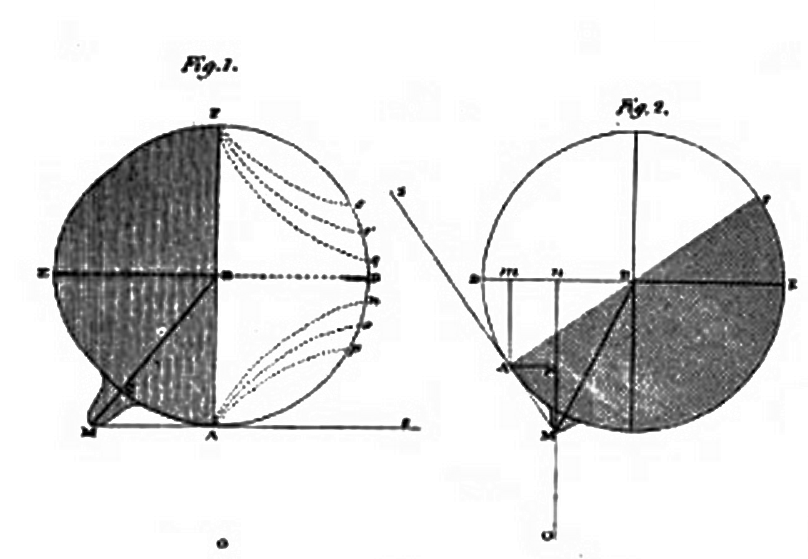
In both figures, the observer is positioned at the bottom, marked (illegibly, due to the scan quality, I’m afraid) by a small letter ‘O’. The first observer sees the Moon at quadrature, half lit, while the second observer sees a crescent.
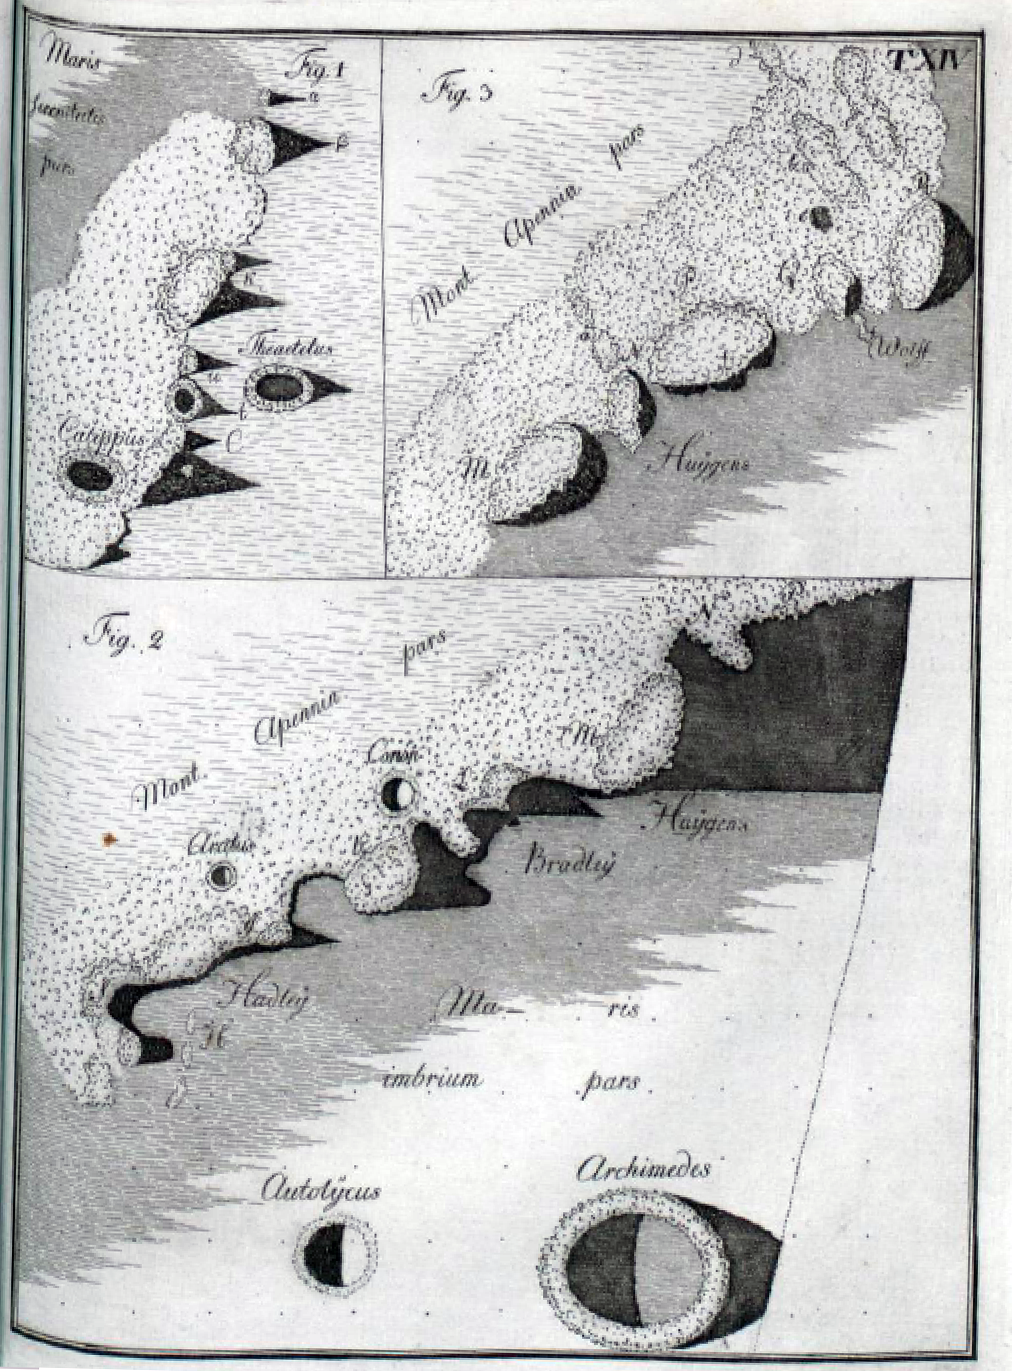
That’s all well and good for a few tall mountains, but it wasn’t good enough for Johann Hieronymus Schroeter, a German astronomer who came up with a new method for estimating the heights of Mondberge (of course German has a single word for “Moon mountains”!): measuring their shadows. He realized that once you know the distance between the mountain and the terminator, you can work out the altitude of the Sun above the horizon, and from there you can translate the length of a shadow into a height! What’s more, you can use this technique to study the topography of any feature – not just mountains – and Schroeter made the first quantitative study of lunar crater depths.3 Here are a couple of illustrations from his 1791 monograph Selenotopographische Fragmente, as well as a compilation of his height and depth measurements:
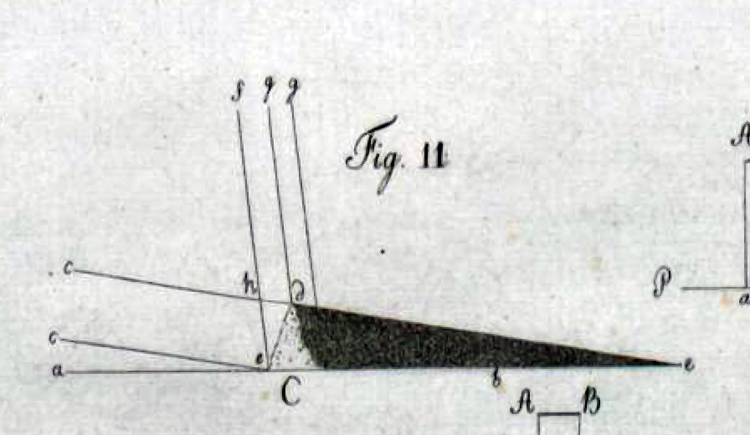
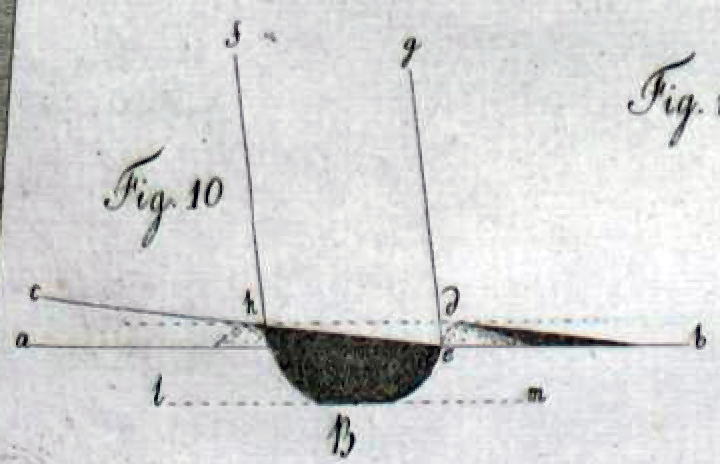
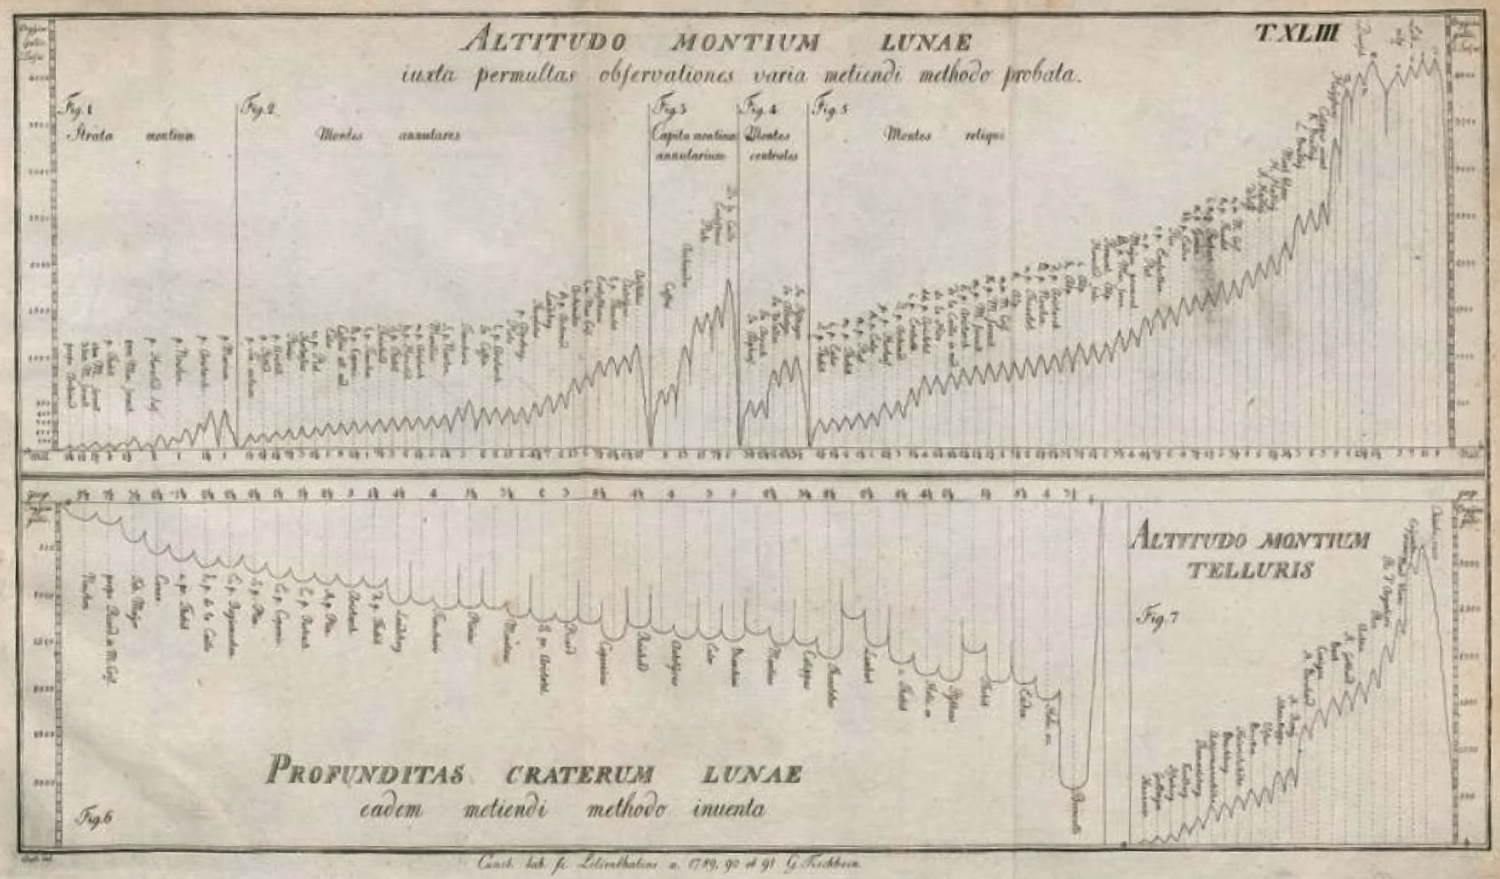
The last 50 pages or so of Schroeter’s book are filled with detailed sketches of rugged peaks, abrupt plunges, and lengthening shadows. His is a Moon of exaggerated relief, sketched at the boundary between day and night (a place, not a time!), where the Sun hangs low in the lunar sky and projects fantastical shapes that nevertheless contain precious information about the true shape of things. His sloping plains and forest-like crater rims also betray Schroeter’s optimism that life might exist on the Moon; looking at his sketches, I can almost believe it myself:
We’ve developed many more ways to study the topography of the Moon in the 200+ years since Schroeter peered through his telescope, and several of them still rely on understanding the interplay of light on rough terrain – but that’s a post for another day. The next time you look up at the Moon (as long as it’s not full or new), take a good look at the terminator, and think about how you might measure your very own mountain. That’s what I’ll be doing.
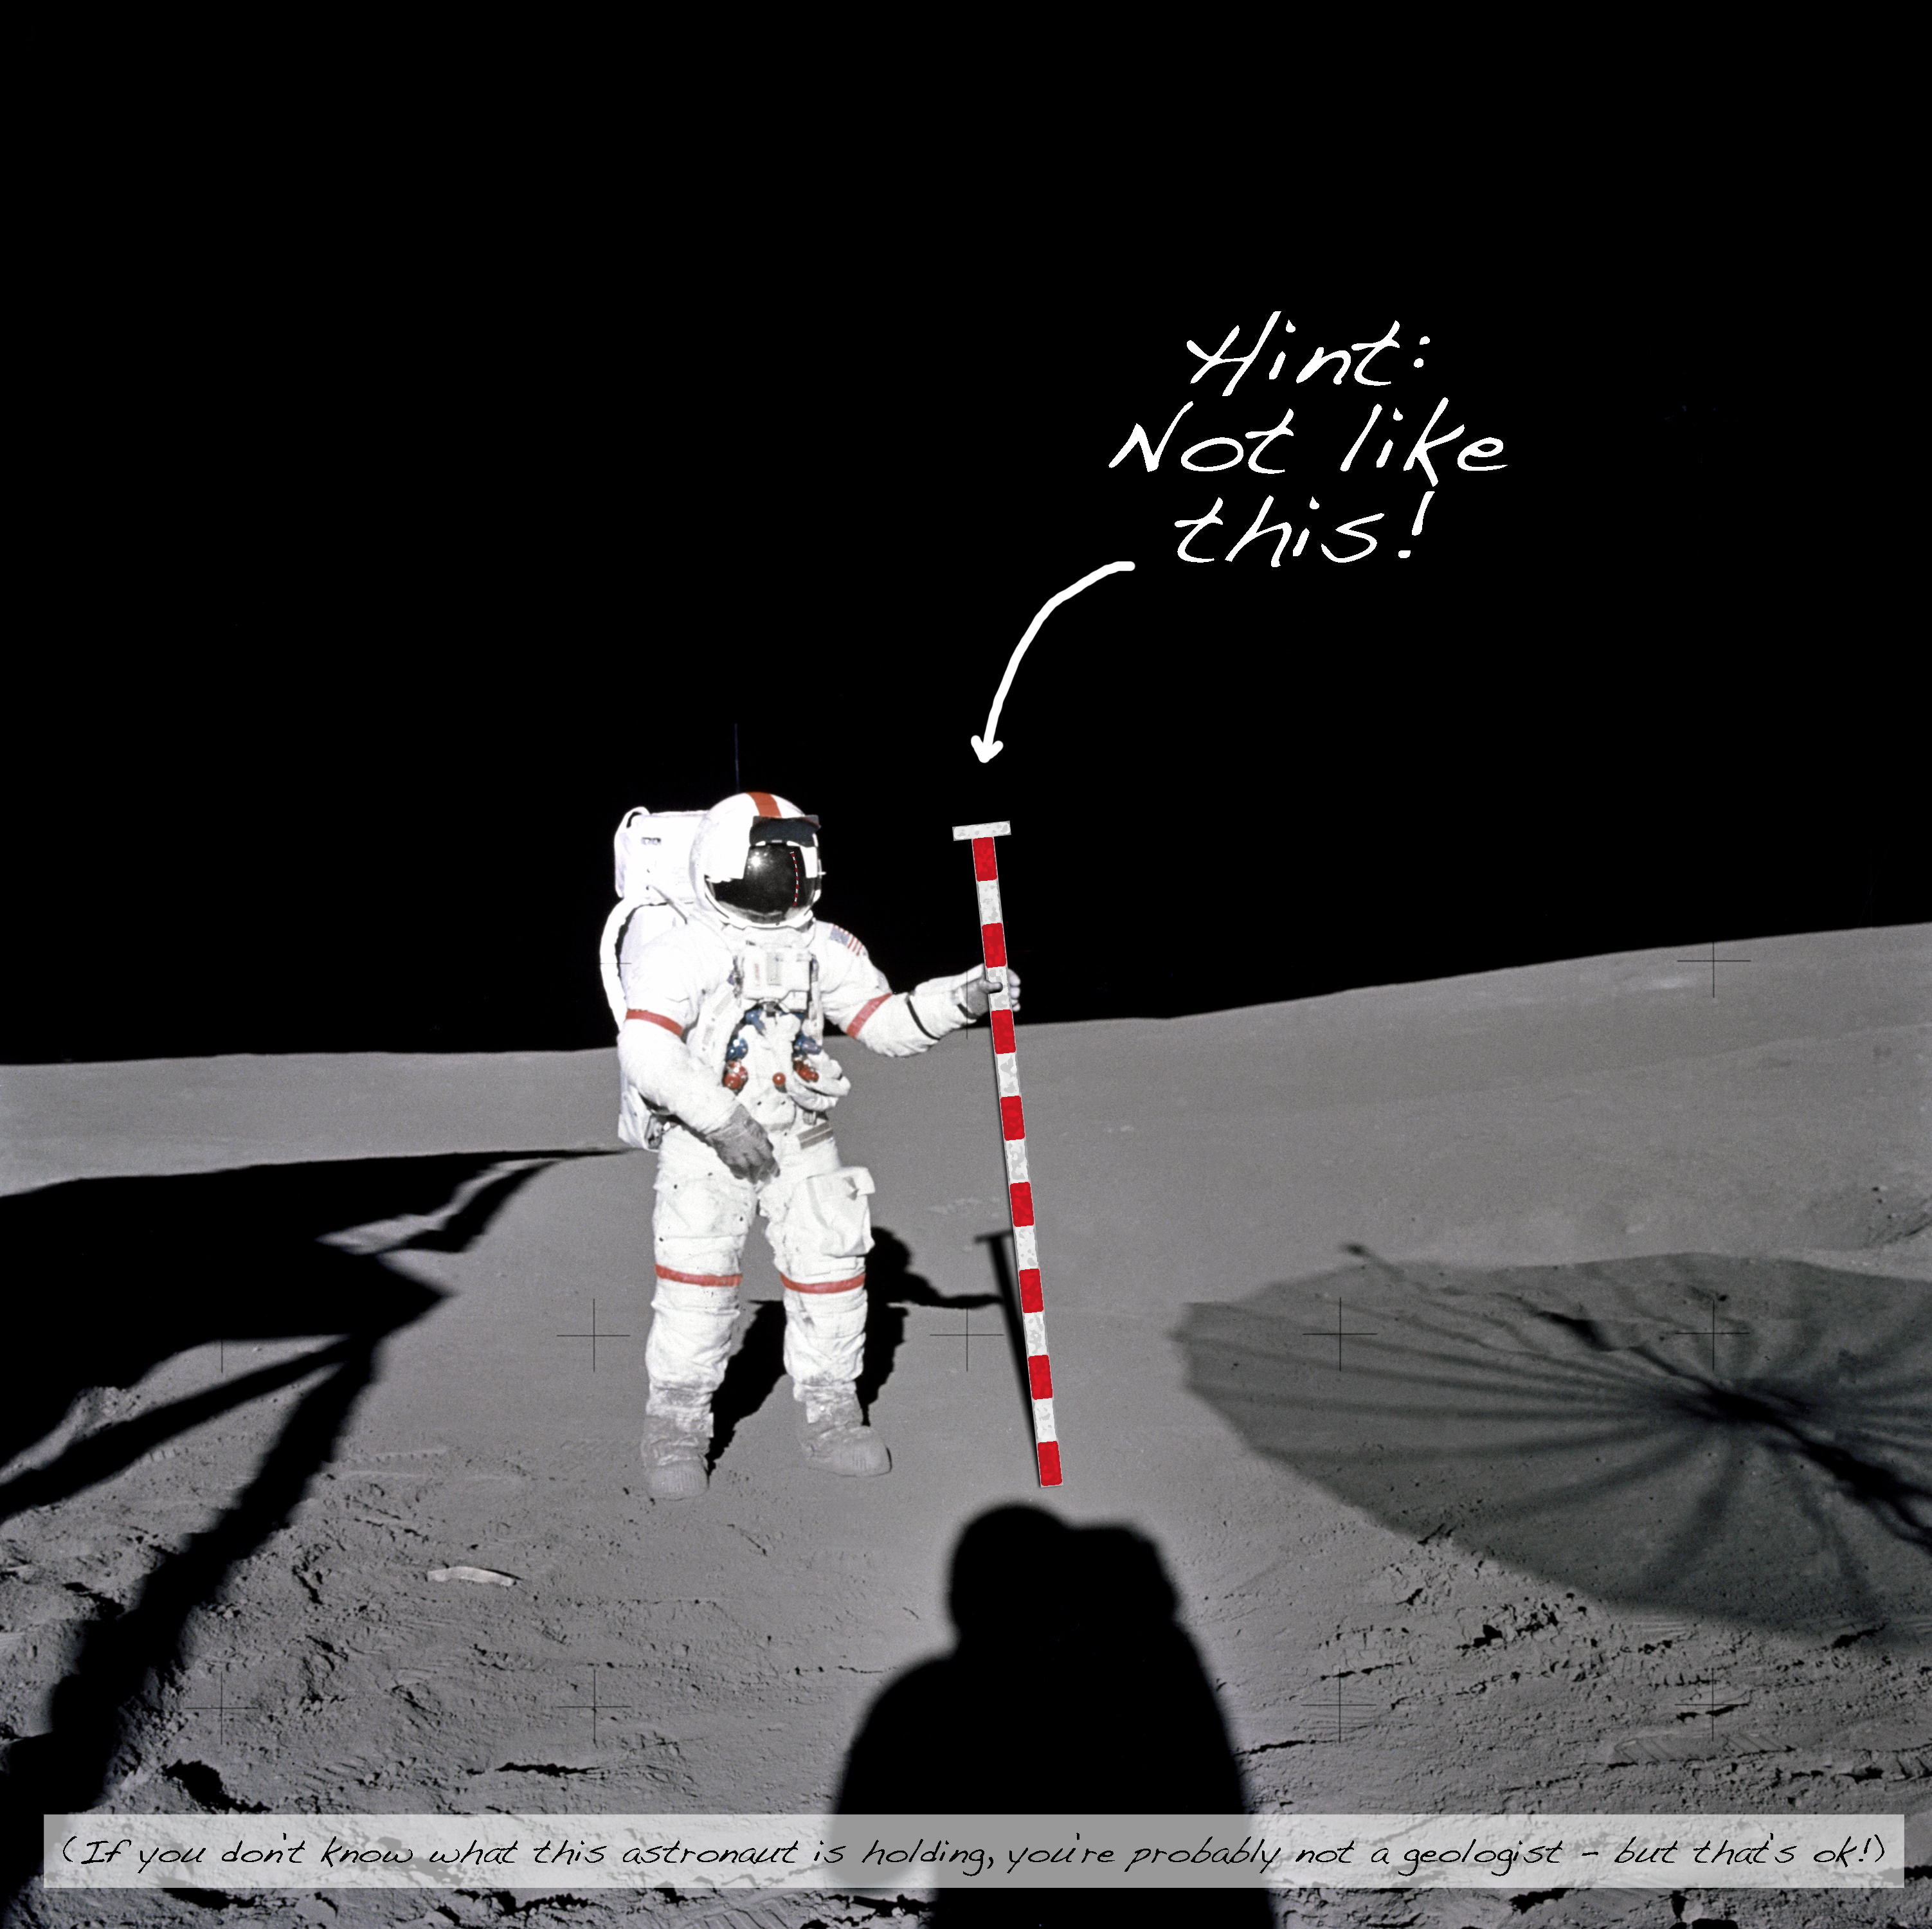
- One of those tools (in theory – it’s not very practical in those suits!) is the Jacob’s staff (added tactlessly to the Apollo photo above), a geologist’s means of measuring vertical thicknesses of rock layers in the field. As you walk up the hill, you use a compass to level the Jacob’s staff and sight to the next place on the hillside, which is higher than the place you’re standing now by the height of the staff. Then you walk to the place you sighted and do it again, and again, until you’ve measured the whole layer (p. 16 of this textbook has a good diagram). Once you know the real thicknesses of the strata (which might be different than what you can see exposed at the surface because of how it’s been eroded or the tilt of the layers), you can construct a stratigraphic column – a schematic sequence of layers and their thicknesses that helps you figure out what happened geologically in this place and how it correlates with other places. ↩
- Actually, “a whole lot of geometry” is surprisingly little! I find it really inspirational that these measurements and calculations are so accessible. In my search for primary sources, I came across many lesson plans that incorporate one or more of these techniques – what a great idea! ↩
- Schroeter was also the first to use the word “crater” to describe the features that he saw. From the Greek for “bowl,” it had been used to describe the caldera of a (terrestrial) volcano by others, but before Schroeter it had never been applied to the Moon. (Whitaker, 2003). ↩
Brilliant post Meg!